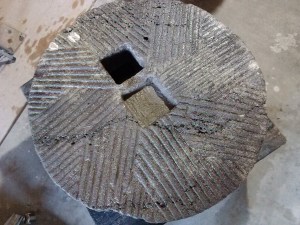
The heavy table

I made this table about 5-6 years ago with the intent of using it with guests downstairs in the studio, but as things filled the space I never had a place for it, and it ended up under the staircase for the duration. It had literally never been used  for its originally intended purpose and gathered dust. Until a few days ago when I started rearranging the studio. Now with the stairs out of the way, it is out, clean, and ready for action. I scrubbed off 6 years of dust and crud this morning and started thinking about how best to use it.

If you haven’t noticed already, this is a huge grindstone (one of a pair I acquired), and it must weigh at least 200kg. Somehow I was able to get it up on that railroad tie frame with the heavy duty casters underneath so it can be moved. The current top is actually the bottom, and the actual top is slanted, so one side is propped up on two short kiln stilts so the table top is level. The grooves are close enough together that cups can sit without wobbling or falling over.

It occurred to me that the depression in the center would make a good improvised receptacle for tea goodies, and a garbage can could go under the hole for waste disposal. One other suggestion was to place a bamboo section in the whole as a small waste basket. One of the railroad ties partially overlaps the bottom of the hole, so the bamboo doesn’t fall through.

The freshly scrubbed table, about 80cm/32in in diameter.
table surface detail
Fresh section of bamboo cut for the waste basket.
goodies, with wrapper disposal in place.
Mmmmm. Nice steamy tea on a cold morning...
Mmmmm. Nice steamy tea on a cold morning…

Snagged a new wheel!

I managed to get my hands on a used wheel, cheap. It is a gigantic banding wheel: wheel head is 50cm across and the whole thing assembled weighs 60kg. It looks like it might have been someone’s homemade wheel, made from acquired parts and put together.

It is an oddly constructed wheel, no bearings at all. The top of the shaft accommodates  a pin in the wheel head like my kickwheel, but there is no bearing in the bottom, just tapered sleeve on the shaft that engages the bottom of the wheelhead shaft, heavily greased. It requires a very fine setting of the tapered sleeve. Engage it too much and the wheel doesn’t turn well, not enough and there is a waggle in the wheel.

It arrived pretty rusty and dirty, looks like it saw a lot of use at some point, then got left in a corner somewhere for a few years. I got a wire brush disc for my angle grinder and spent quite a while getting the accumulation of clay, gunk, paint, and rust off.

Removable wheel head shaft
Base shaft
Base shaft
wheel head
wheel head
tapered sleeve
tapered sleeve
The whole shebang, still dirty.
wheel head assembly oiled and ready.

Finally got the wheel head assembly cleaned up and oiled, and with some experimentation found the ‘sweet spot’ for the tapered sleeve when engaging the wheel head shaft, and the wheel spins quite nicely. Click on the link below to see it spin:
Wheel spin test

My plan for this wheel is to weld arms to the base of the wheel head shaft and mount a wooden fly wheel, and add a wooden wheel head onto the current steel wheel head. The resulting kickwheel should be great for onggi style coil and paddle work.

Remodeling the studio

It has become increasingly obvious over the last year or two that a major remodeling of the studio was going to be necessary. As output has increased and work habits have changed, and the fact that I want to put in a wood burning stove for winter heating, changing the configuration of the studio has become unavoidable. I’d been putting it off for a long time because it is going interrupt, but I last week it finally reached critical mass and I decided to bite the bullet and get to work. So…

First order of business is to get the stairs into a more manageable place, and add some floor space to the second floor. Here is a series of photos of the project:

Start. Gotta get the stairs out of the way, remove the visible section of floor, and remove the shelving underneath.
Stairs and floor removed
Stairs removed, floor next.
Shelving gone.
Shelving and floor gone.

Interesting note here: when I removed the floor and started taking things off the shelf so I could dismantle it, I found my studfinder that I’d been searching for since, well since I put in that floor section 4 or 5 years ago. I looked everywhere for that thing!

Bottom shelf/clay storage gone.

I’ll still need to remove and redo the shelving at left, but for now just removed enough to get this project accomplished. Baby steps…

Post secured, main beam laid over the top.
Oops, very heavy stairs on the wrong side of the beam.

The ‘beam’ is actually two 4.5 cm thick boards screwed together. In my rush to get the beam in place, I forgot to move the stairs to a place within the work area. Doh!  Stairs 1, Homo Sapiens Sapiens 0.  But it all worked out ok, I threw the rope over the newly placed beam and used it to lower the stairs to the ground, then slid them over near to their final resting place, without destroying any discs in my back. Yes! Stairs 1, Homo Sapiens Sapiens 1. Take that, stairs!

Stairs on correct side of beam, cross supports almost in.

This is my first project where I have discovered the forbidden delights of the Simpson Strong-Tie. I’d seen them before in the States, but only recently in Japan, and only at one of the home improvement stores. They saved me all kinds of time, since I didn’t have to cut all the joints for the floor joists, and as an added bonus, they’re cheap.

Floor boards almost done.

I secured all of the floor boards from below, so there are no screws or screw holes visible on the floor surface, and no need for wood plugs or putty.

Floor boards done, stairs back in place.

As you can see, the stairs come awful close to the remaining shelving at left, but they are accessible. Moving the shelving is on the to-do list. Still, looking good from here…

The view coming up the stairs.

Nice expanse of natural wood with no nails or screws visible.

Staring down the floorboards.
The view of the stairs from the far corner. All done.

All finished. This is the view from the doorway side of the shop looking back toward the stairs. The original part of the second floor at left. Stairs are up against the wall, and the studio already feels roomier.

Spring Firing Wood

is split, stacked, and ready to go. Now all I need are some pots to fire….

the last of it. splitting done.
Douglas fir stacks next to kiln
four palettes of slender cedar and pine, two palettes of douglas fir.
the stuff that wouldn’t fit on the kiln side of the studio

Salvage day

I got a sudden phone call yesterday evening, a friend was going to the site of an old house that was getting torn down. Apparently everything that didn’t get taken out was going to be tossed out with the demolished house parts.

No one had been living in the house at all for about 20 years, and I don’t know how old the house was but it was pretty old. I think it was probably pretty nice in its day, beautiful carving in the wood around the entrance. Kind of sad really, imagining it how it must have been even only fifty years ago, when seeing it in its present state.

The structure consisted of a farmhouse with attached barn and toilet area. What must have been the kitchen area had already collapsed several years ago, and we had to walk over that to get to the house. The entry way was old style domashiki, with a dirt floor where you removed your shoes and stepped up onto a raised floor. We didn’t take off our shoes today, just stepped up and waded through the remains of several generations of existence, what got left behind when the occupants moved out. Old wooden chests, a wooden mortar for pounding rice, things I would normally jump at, but they literally crumbled in my hands when I touched them.


Going upstairs was strange because among all of the old tools and farming equipment was an old loom in one room and the remains of a teen age boy’s life in another. There were posters of girls and cars ( best guess, late 70’s early 80’s) on the wall still, and in surprisingly good condition. There were many bundles of cotton still neatly wrapped up in paper and twine, but the loom was completely rotten, riddled with bug holes in the wooden parts, and metal parts rusted away.

I picked up some nice slabs of wood from the second floor. Inch thick pine forty to fifty cm wide, from 90cm to about two meters in length, all of it with nice figuring and shot through with wormholes. They were all milled by hand saw, the pattern of the saw still showing. When I finish them I will try to keep that saw pattern rather than sanding it away. They will make very nice boards for displaying pots.


In the downstairs and the barn were some old large jars. The two largest would hold me easily. 120cm tall and over 90cm wide at the shoulder. There were two smaller jars in the entryway of the house, about 80cm tall each. In one of them was a positively horrid smelling sludge left over from who knows when. Honestly, it smelled like sewage, but this was the one jar that had a smooth interior liner glaze, and what was inside was probably the remains of something fermented, like miso or nuka pickles combined with the rotting rice straw mats covering the mouth of the jar, the water dripping in through the roof, and whatever rodent and bug parts that had fallen in over the years. Ok, sewage.


There was one more of the huge jars in another room apart from the house. As with the other structures, the cob covered bamboo lattice walls had slowly melted away to reveal the mouth of the jar, which was 2/3’s buried in the earth? I asked if that room was another part of the barn and the owner replied that it was the toilet. I contents of the smaller jar immediately came to mind but I quickly reverted to blessed denial. I found out a couple of years ago that one main use of large jars in the farming community was fertilizer. People collected the nightsoil and put it in these large jars to compost down into fertilizer that would be used on the crops. Anyway, after experiencing the smaller jar stench, I decided to steer well clear of the toilet jar whose contents were less open to debate.

-Posted from iMike

Fukunokami 福の神

This is one of my favorite water jars, not just from the Karatsu tradition, but from all water jars the world over.

image
Fukunokami, coil and paddled jar, ame glaze.

I like the way it looks more like an old burlap sack than a pot, partly due to the way it was made, and partly from the firing.
Here are two I made as a sort of practice. If I can come close to the original,  I’ll be thrilled, but just getting the practice is the main goal here.
Whoever made the original really really knew what they were doing. It is coil and paddled, and about three mm thick throughout.

image

image

Also, some other pots in the works:

image

image

image

image